Tuesday 30 April 2013

The Chalmers Cortége 2013


Time again for the yearly Chalmers Cortége in Gothenburg. I have been elsewhere today, but arrived back in Gothenburg just in time to catch it.


You will find more than 170 pictures from the Chalmers Cortége in a public web album here.

Monday 29 April 2013

Hadouken Photo Practice


Practicing for the Hadouken photo event in Gothenburg on Saturday. :-)

Hadouken is the latest photo craze. The idea is to take photos that emulate Hadouken energy (ki) attacks from games such as Street Fighter. It started in Japan, and is now spreading over the world.

I shot this in Halmstad a couple of days ago. Since I was alone at the time, I had to resort to a bit of photo manipulation.

I put the camera on a tripod, and used a remote trigger to take two shots. Compositing them was easy to do in Pixelmator.

Hadouken is even easier to do, because there is no photo manipulation  involved. What you need, is a couple of friends or acquaintances, who like to play.

If you live in or near gothenburg, why not join us on 4 May? Here are links to the G+ event and the Facebook event.

Sunday 28 April 2013

Photo Critique II

Some images I have submitted to The Grid for critique:


To jump a bit higher, you must try a bit harder!


The most difficult part of a trick shot is often the same things that are difficult with a more normal shot. Finding a nice, uncluttered skyline, for example.

For this shot, I wanted an upwards slope towards a crest giving me a clean skyline. There are a couple of places like that in Gothenburg, where I live, but the ground is covered in asphalt.

To find this spot, I went to Halmstad. I had other reasons for going too, but while I was there, I took advantage of the opportunity.

This shot is a pre-study. Six weeks from now, those trees will have leaves, the grass on the ground will be green, and I will go back to take a similar shot, but with nicer colors.

A shot like this is fairly easy, but it does require a bit of post processing. I've been looking for something even easier to do, that still can look very good. Something suitable for beginners that want to get started quickly and easily. I have found it. More about that soon.

Friday 26 April 2013

Photography Business: Tipping Point


The trick to building a stack like this, is to begin by positioning the top piece of wood, and then work down. Most people try to build from the bottom up, and fail. The picture was shot at a science fair in Nordstan, Gothenburg.
Most people who start a business ask themselves what to do. For example, a photographer might ask: "what kind of photography should I do?" Most photographers come up with similar answers, like "be a wedding photographer", "shoot babies" (with a camera, of course), "focus on food".

I have chosen to do it a bit differently. I started by asking "why":
  • Why do I want to be a photographer: Because I love to create a good picture. Because I can share at least a piece of the wonder and excitement I feel, because I might inspire other people to strive to fulfill their potential as I do mine, because I myself have been inspired by other people and want to pay it forward, because I want to pay my bills, because I can combine photography with other things I love: writing books, and business strategy.
  • Given that everyone can take a picture, why would anyone be willing to pay for mine: Because my pictures are a novelty: They can show people and things flying, flesh melting, body parts rearranged. Lots of people do not want that of course, but they are still intrigued, and drawn in.
So I do have a few things going for me. I am constantly trying to find things I can do that improves my usefulness to my clients.

To do this, I watch closely what other photographers do, but I am even more interested in what they don't do.

If I can find things I can do that clients would like, but other photographers don't do, I have an edge.

Take this mug, for example. All photographers I have checked provide pictures for their clients digitally, usually on CD. Most provide prints.

I do that of course, but I believe it is more fun for a client if they can have their pictures on useful items, like mugs, phone and tablet shells, key rings, hats, bags, and other items.

So, in addition to offering digital files and prints on paper, I also offer prints on mugs, hats, etc. It is a differentiator, just like my trick shots are a differentiator. And in business, we are interested in differentiators, because they can give us an important edge.

A differentiator does not have to be large. If clients like it, then, over time, it can make a big difference. Eventually, when you do things like this, you will build a reputation, and business will take off.

Oh, and I should tell you, the mug differentiator has a small twist, a second level differentiator: The mug is normally black, and the picture is invisible. When you fill it with a hot beverage, the mug turns white, and the picture becomes visible.

On top of that, there is a third level differentiator, but that one is between me and my clients. :-)

Tuesday 23 April 2013

Poseidon Censored (The Censorship Sucks! T-shirt)


I am officially opening a web store: I Love Gothenburg. Several reasons for this:

  • Having an online store isn't just for mass market items. It allows me to easily create custom items ranging from t-shirts to binders, business cards, mugs, water bottles, and hundreds of other items for my clients. For many of my clients, I can be a one stop shop. This makes it a lot easier to buy my services than those of most other photographers.
  • An online store is excellent advertising. It can also be a source of inspiration for clients. I can show them what a t-shirt, mug, or phone case looks like with one of my pictures on it. It is a short step to imagining a picture showing my client on the same type of item.
  • I like to design stuff. It is worth doing for the sheer fun of it.
It is my intent to set up more stores than  I Love Gothenburg. Each store will focus on a specific topic. I will build stores around topics I am interested in.

 I Love Gothenburg is a small store right now, but I will add several new items every week. When the store is large enough, I will start building the next one, and so on.

Sunday 21 April 2013

I Shot Batman!


I got a couple of shots of Gothenburgs most reclusive celebrity, The Batman yesterday. Most people believe Batman lives in Gotham City, but he made the move to Gothenburg years ago.


Saturday 20 April 2013

Shoes and The Interaction/Isolation Principle


The Interaction/Isolation Principle is the most powerful principle in photography that you have never heard of. It goes like this:

Strategy is a game of interaction and isolation.

It may not be immediately obvious that this has to do with photography, but but it does. Here is why:

When someone says "game", you probably think "chess", or "poker", or your favorite computer game. Actually, a game, for the purpose of this blog post anyway, is any competitive activity where individuals interact and decision making matters.

Thus, war, business, and love, are all games. Photography is a game. The photographer and the audience interact by sending each other messages. A photo is a message. So is a +1 on Google+, a Like on Facebook, a comment, and a payment for the photo.

Thus, we could create a more specialized version of the Interaction/Isolation principle for photographers:

Photography is a game of interaction and isolation.

The principle applies to both the business part of photography, and to the taking-a-photo part of photography. In this article, I will focus on the photography part.

I hope you will agree that the photo of the shoes above is reasonably good. Not great, mind you, but good.

What is it that makes it good?

Let's look at the picture from the perspective of isolation. The picture is a close-up, and the depth-of-field is quite narrow. This isolates the shoes from the environment.

You may also notice that the background is quite desaturated. Originally, there were strong blue elements, jeans legs, drawing the attention away from the shoes. So, I increased the saturation of the shoes, and decreased the saturation of the background. That also serves to isolate the shoes.

It is easy for a viewer to focus on the shoes, simply because there is little else to focus on.

When you see shoes on a street, they usually come with a wearer. This pair don't. They are isolated from the wearer. This piques interest: Why are a pair of empty shoes laying in the street? Why were they left there? What is the owner doing?

So, a pair of shoes isolated from their owner is a potentially interesting scene. By isolating the shoes from the environment, I made them easy to focus on.

There is also a bit of interaction in the photo: The shoes are touching, and the left shoe holds the right one up a little bit. That creates a sense of connection.

The more important interaction, however, is the one between you and me. The photo as a whole serves to send a message, or rather messages. There are messages about the picture itself, but overlaid, there are other messages, like "come read my blog".

It worked, didn't it? Since a blog is interactive, you can now send me a message. If you like the article, you can click the +1 button, or comment. And of course, I can send you another visual message, like this one:


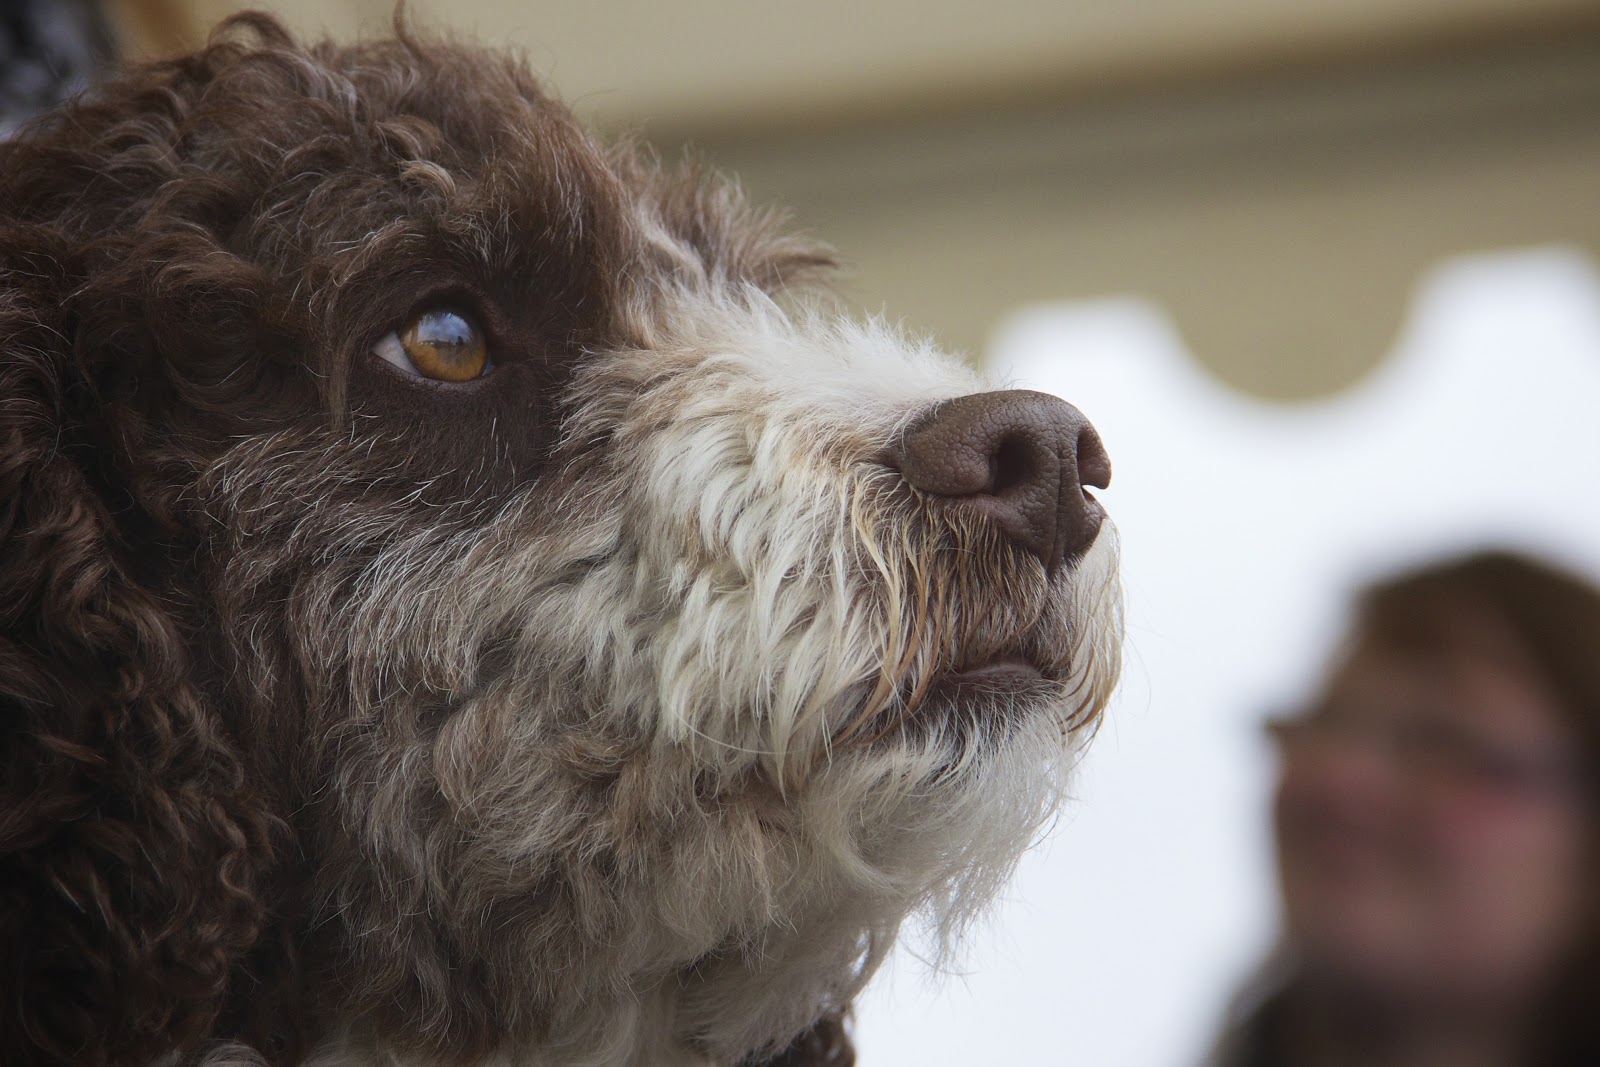
Note the similarities between this picture and the shoe picture: The main subject is isolated from the surroundings, and there is interaction between the two main elements.

Quite strong interaction. :-)

Do a little experiment: Take a walk today, and look for something interesting. When you find it, try to find a way to photograph it that isolates it from any distracting elements. Take the shot. Is it a good picture?

If you like the picture you took, post it anywhere you want, then leave a comment here and include a link to your picture. I am curious to see if this little tip works for you.

Understanding the nature of a game does not make you invincible, but it does improve your odds when you are playing. I am a strong believer in working from basic principles, and the Interaction/Isolation principle is one of the most useful I know, because it is applicable to all strategic games.

End note: You might wonder where the Interaction/Isolation principle comes from. The principle defines the nature of all strategic games, and the person who first expressed it was Col. John Boyd, U.S. Air Force. Boyd was a master strategist, and much of what he taught can be applied to all strategic games, including photography. Of course, you will have to do a certain amount of translation. :-)

Thursday 18 April 2013

Woman in Shop Window


Every morning I take a walk before work, camera in hand. Every morning I find something interesting to shoot.

This morning, I broke my habit. It was raining, and I left the camera in my backpack. It almost cost me this shot. I saw this woman in a shop window. By the time I had got my camera out of my backpack, she had finished with the window she was working on, and was leaving.

I saw there were a couple of empty windows in the store, so I waited, and after a minute or so, she started working on the window you see here, and I got the shot.


Monday 15 April 2013

Matters of Gravity!


Gravity failure! Happens from time to time in my line of work. Here is how to do it:

I started by setting up my camera on a tripod in my living room. For this kind of shot, you need a camera with a manual exposure mode. You also need to set camera white balance manually. If you do not, you may get problems matching colors in different parts of your composition later.

I took seven shots that I intended to use. Here is the final composition again, and the seven shots:


As you can see, ice cream boxes and a doorstop were essential in creating the picture. I enjoy going MacGyver when doing shots like this. I used adhesive to prevent items from slipping.

The key to creating an effect like this is building the picture layer by layer in a graphics editor. Photoshop is the most well known, but there are many others, like The Gimp, and Pixelmator. I am using Pixelmator.

As you can see in the picture to the left, I am using layers and masks for just about everything:

I mask the images with the different objects, then add layers for adjusting brightness and color. The advantage to working this way is that it is non-destructive. I can easily fine tune a change after I have made it.

I can also limit a change to specific objects. For example, I made a separate layer for brightening the raspberries, another for the cake, a third for the tie, and so on.

To brighten objects, I duplicated the layer containing the object and set the blend mode of the duplicate object to Screen. I could then adjust the amount of brightening with the Opacity slider for that layer.

The tie looked a little bit washed out in the original photo, so I added an extra tie layer and set its blend mode to Soft Light. That gave the tie a bit of extra punch.

Here is a small, but important tip:

I like Pixelmator, but it has one serious omission: There is no built-in function for creating shadows. There is, however, a plug-in that does the job very well.

Here is how to install it:

  1. Download the file http://belightcommunity.free.fr/download_file.php?uid=49
  2. Locate the file BC_Shadow_1.5.qtz in the Download directory.
  3. Drag and drop it into /Library/Compositions. (Your Mac will open a dialog prompting you to enter your password to authorize installation.)
  4. Restart Pixelmator, if you had it running.
The Shadows filter is now installed under Other in the Effects browser.

You can find the same tip on the Pixelmator support site.

I recently heard someone, who happens to be very, very good at using Photoshop, that in practice, "you never change the names of the layers". As you can see in the picture, I do. I also group layers.

Because I use meaningful layer names, and logical layer groups, I don't get lost when the layers start to build up. This saves me time.

For this picture, I used seventeen layers in six groups. If I had been using default names, I'd still be working on the image instead of writing this blog post.

See you soon.

Saturday 13 April 2013

Shooting Dogs!


I went to a dog exhibition today. Shooting dogs is challenging because they are so common. Everyone knows what a dog looks like. Everyone knows at least a bit about dog behavior. Google lists 1,420,000,000 results if you search for "dog". 500px.com has 71592 dog photos, many of them depressingly good.

So, what do you do to make it interesting?

First, two very basic things:
  1. Get down to the dogs eye level, or lower.
  2. Get close.

You'll notice all shots in this article follows these two rules.

What's rule number 3?

Look for an interesting dog!

I found one with sectoral heterochromia, different parts of one iris have different colors. As you can see, I really lucked out, because the dog's left iris is white.

 
You may catch a dog doing interesting things. When something interesting happens, it often happens very fast, so I set my camera to shoot high speed, and hoped for the best.

When I shoot things that move, I usually shoot in bursts of 3 shots. Easer to catch an interesting moment.

Playing with foreground and background elements is also a possibility. In this shot, the dog owner, out of focus in the background, suggests that the dog is thinking about her.

Actually, this is a bit of a cheat, because the woman in the background isn't the owner. The owner stood in front of the dog throwing dog biscuits. The dog is thinking about catching the next biscuit.

And, I am thinking of the next shoot. See you.

Friday 12 April 2013

It's in The Eyes!


Here are two more shots of Linnéa Ivarsson at the Swedish Baking Championships. (See A Rose Good Enough to Eat.) I wanted to capture the joy of creating beautiful things, and also the concentration and focus required to do so.


The best way to do that, is to shoot hands and eyes. The hands are where the action is. The eyes show the focus and emotion.

A Rose Good Enough to Eat

A Rose Good Enough to Eat
It's the last day of the Baking Championships. It has been really fun to shoot.

Linnéa created the rose in the photo above.
Shooting the championships has been a bit of a challenge from a technical point of view: No flash, and challenging light conditions.

I'd love to do this again, with more control over the light. I might get the chance, because a local business took some interest in my pictures. We'll see what develops.


Wednesday 10 April 2013

6 + 13 Presentation Books Every Photographer Should Read

A slide from my Reality Dysfunction presentation. If not for Garr Reynolds, it might have been full of bullet points.
Being a photographer isn't just about photography. You need business skills, and another, very useful skill set is creating and holding presentations.

I hold presentations at conferences and sometimes at companies, universities, or various events. Nowadays I am pretty good at it, but I used to suck. This isn't my opinion, it is the opinion of the people that matter, the audience. I know, because I measure audience response.

I have never met Garr Reynolds, but he is the person that taught me to make better presentations. Reynolds is one of the world's best presenters, and he has written a number of books on the topic.

A friend of mine, Erik Lundh, sent me a link to a blog post by Reynolds where he lists thirteen great books on communication, and I thought it would be a good idea to share it.

First, to add a bit of value, I'll give you a short list of my own favorites, in no particular order:

Here is the link to Garr Reynolds's post.

A Brief Food Photography Tutorial: Yummy!


From the Swedish Baking School Championships in Gothenburg.

Here is my recipe for taking a yummy food photograph:

  1. Photograph only beautiful food. If you look at food photos on Facebook and G+, you will understand why this is an important rule.
  2. Think "flower photography". You never photograph flowers from above. Same thing with food. I went down on my knees to take this one.
  3. Get close. This is a good general rule. Robert Capa, a famous war photographer, once said, "If your pictures aren't good enough, you' re not close enough." This piece of advice works for more than war photography.
  4. Use the rule of thirds! There are better rules, but this one is simple enough for me to remember when I am in a hurry. For an example, look at the foremost strawberry in the picture above.
  5. Take the shot. In this case ISO 4000, f/8, 1/160s, 135mm. If I had been working, I would have used a flash. As it was, I had to crank up the ISO instead.
  6. Fix it in post! If fixing flaws in post processing is good enough for George Lucas, it is good enough for me. I always post process the pictures I take. 
  7. Auto enhance. I usually start post processing with Auto Enhance in Aperture.
  8. Crop the crap out. The next thing I do is cropping the picture to get rid of distractions around the edges.
  9. Retouch. I spent some time removing crumbs in the lower third of the picture. I also removed part of a leaf on one of the strawberries.
  10. Enhance colors. I did make the strawberries look a little bit more red by increasing luminance and saturation slightly.
  11. Change overall saturation and vibrancy. I really should have fixed this before working on the strawberries.
  12. Increase detail. You may loose some detail while fiddling with saturation and coloring, so it is worth the effort to check if you need to bring some detail back. There is a Detail slider in Aperture that does the job nicely.
  13. Add a vignette. This is a matter of taste. I like vignettes because they help guide the eye to the important bits in the photo. The Vignette function in Aperture has its limitations, but in this case, it sufficed.
I wish I could say I finished by eating what I photographed, but alas, that was not to be. Maybe next time. :-)

Here are some food photography resources:

The Jenn Cuisine Blog - A tutorial collection
Spiciefoodie has a nice tutorial


Pink Rose


From the Swedish Baking School Championships 2013.

Tuesday 9 April 2013

I met Tobias Anderberg at BNI Centrum in Gothenburg


Yesterday I visited a BNI Centrum, a Business Network International team in Gothenburg. BNI is a business reference network, a useful place for business people to develop business contacts.

At BNI Centrum I met a lot of nice people, including photographer Tobias Anderberg. Tobias was there to shoot the team in action.

For once, I left my camera holstered. Tobias will put some of the pictures he shot in his gallery though, so you can have a look here if you want to see what went on at the meeting. (At the time I write this, Tobias hasn't had a chance to update his gallery yet. If the pictures aren't here when you read this, just wait a day or two, and check the link again.)

Reflection


From my morning walk. It has been a long winter, and I am glad to see the that the ice on the canal is finally melting away.

Sunday 7 April 2013

The Reward

This is the full story I started in The Visitors are Our Friends and So, You Visitors Came Here to use Us as Food? I decided to bring it together on a single page.

I used Aperture to process the images, and Comic Life 2 to put them together into a little story.

So, You Visitors Came Here to Use Us as Food?


The Visitor suddenly realized the plan had a fatal flaw...

You may wish to check out part 1. (And yes, part 3 will appear soon.)

The Visitors are Our Friends!


We are your friends. Don't heed the rumors, and don't look at part 2.

Saturday 6 April 2013

Have an Orange!


This somewhat disturbing picture is an example of flesh manipulation, changing the way a human or animal looks using image manipulation techniques.

This photo is a composite of five different images, blended together using Pixelmator. In addition to creating the creature, I also did some retouching to remove reflections from the softboxes I used to light the scene.

Wednesday 3 April 2013

How to be a Successful Photographer


It is difficult to make a career as a photographer, so I gathered eight of the top articles, according to Google, on how to become a successful photographer:

    1. 14 Tips to be a Successful Freelance Photographer by James Maher
    2. 10 WAYS TO NOT BECOME A SUCCESSFUL PHOTOGRAPHER by Luke Copping
    3. How to Go Pro by Ken Rockwell
    4. The Secret to Success in Photography by Chase Jarvis
    5. How to Become a Professional Photographer at Wikihow
    6. One Example Of Becoming a Successful Photographer Through Specialization by Trevor Dayley
    7. Seven Steps to Becoming a Confident Photographer by Natalie Norton
    8. How To Become A Successful Full-Time Photographer In 1 Year by Stephen McConnel
    Now, I'm going out to shoot. I'll read 'em when I get back.

    The Cyclops: Capturing the World Within


    My son told me the picture above is the one he likes the most of all my photos. I must confess, it is one of my favorites too. It's a snapshot, without much regard to getting the background or the composition right. There was just this one moment, and I had to take the shot, or lose it.

    The properties that make this a favorite shot for both my son and myself, are entirely subjective. The shot captures his active imagination and energy. 

    If you knew him, you would know that there is a story behind what he is doing. We have told each other stories since he was old enough to speak. Together, we have met trolls, dragons, wizards, Galileo, Picasso, superheroes, and villains.

    More than that, he is not a photography buff, but he does on occasion come up with an idea for a photo, like the one above, or when he wanted me to take photos of him flying, or when he becomes a director, and poses other people in front of my camera. And yes, he does it very well. I have no idea where he picked up how to pose a model, but he does it better than I do.

    So, it is not just the photo itself, it is the back story and emotion imbued in it.

    Monday 1 April 2013

    Happy Easter!


    Recent research shows: Dinosaur eggs were made of chocolate!

    Actually, I got the chocolate egg as thanks for being a model for Anna Sigvardsson, a photographer in Gothenburg. I photographed the dinosaur eye at Universeum in Gothenburg. The original dinosaur was designed and built by Emilio.

    I composited the images in Pixelmator.