Saturday 28 April 2018

Kyla vs. Deep One (Cthulhu Mythos Meets Cavewoman)


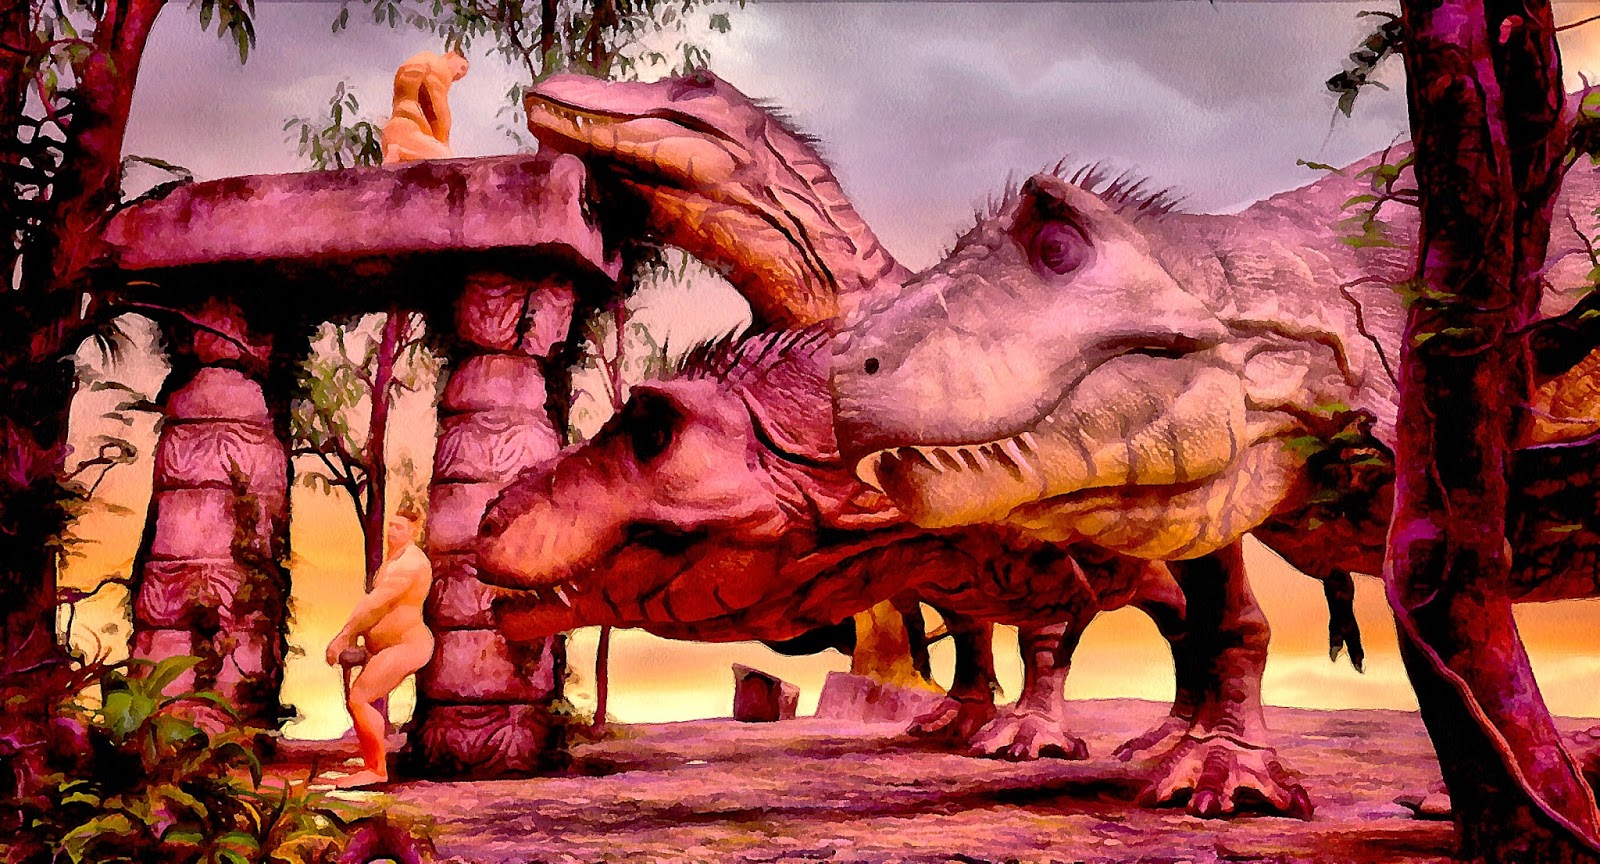
One more Kyla picture. Kyla vs. a Deep One. A very, very muscle-bound Deep One. :-)

The interesting thing to me, is that if I can create a passable Deep One, it opens up a whole range of storytelling. The Cthulhu mythos provides rich, and partially copyright free (check very carefully what is free to use, and what is not, if you do anything commercial) material to base stories on, or to weave in as story elements.

I will hold a Photos Inspired by Books event on the 12th of May, in Gothenburg. This picture isn't a photo, of course, but the important thing is the sources of inspiration. In this case:
  • The Cthulhu Mythos created by H.P. Lovecraft, and developed by many different writers.
  • Marvel/DC Comics superhero comics. Yeah, there is a reason for those overdeveloped muscles. Check out Marvels Abomination.
  • The Cavewoman comic by Budd Root. Technically, Cavewoman belongs to the Lost World literary genre, which is a sub-genre of Science-Fiction. By the way, so does Jurassic Park and King Kong.
So, there are three major literary sources of inspiration for this picture. I believe that in order to create something new and interesting, whether it is a picture, or anything else, you need to stoke the fires of your imagination with many different kinds of fuel. Indeed, creativity is the ability to deconstruct those sources, in order to build something new.

There is more of course. I have written before, about how Kyla herself is a result of playing with genre conventions, and flipping gender roles. Kyla fights monsters, she is no damsel in distress. (She has been quite distressing to some people in Facebook art groups though, who prefer more demure, and more fully dressed, women.)

A little bit about the technical side of creating the picture:

The Deep One is a Michael 4 3D mesh with Creature Creator and The Freak morphs. I used the Daz Studio Leather shader for the skin, and changed the skin color.

I rendered with Iray in Daz Studio, tweaked the picture (strategically placed hair and a bit extra brightness and contrast) in Affinity Photo. I worked in 16 bit mode to get a little bit of extra punch in the colors.

Finally, I painted the whole picture in Dynamic Auto-Painter.

Just like there were three different sources of inspiration for the idea, there were three different tools that contributed to creating the actual picture.


Here is the original 3D scene, as I built it in Daz Studio. Whether you prefer the painted version or the original is a matter of taste really. (I doubt anyone who does not like either reads this far.)

While working on this picture, I was actually more concerned with the lighting than the scene itself. The reason? Because this picture is a warmup picture for a slightly more complex picture that I haven't done yet.

Be seeing you!

Wednesday 25 April 2018

An Afternoon in Pal-Ul-Don (Aspect Ratios, Stephen Spielberg, and Facebook Click Optimization)


Pal-Ul-Don is a Lost World from Tarzan the Terrible a novel by Edgar Rice Burroughs. This scene is not from the book, but loosely inspired by it.

My pictures are inspired by what I read, the movies I see, comics, conversations I have with other people, and of course my own experiences.

Technically, a picture like this is much easier to create than you think. I am a photographer (well, when I am not a systems thinker that help organizations improve their processes and their organizations). When I create a picture like this, I think like a photographer, and to a large extent, work like a photographer.

For example, you may have noticed that this picture has a slightly different aspect ratio from what you are used to. That is because it is 1.85:1, which happens to be the aspect ratio Steven Spielberg chose for Jurassic Park.

Why did he do that? Movies are usually shot in a 2.4:1 aspect ratio, making the pictures very wide. his is great for a lot of things, but it gets cramped for a dinosaur that is very high.

The picture above compares the 1:85 aspect ratio Stephen Spielberg chose for Jurassic Park with the 2:3 ratio common in photography, and the 2.4:1 ratio of most movies.

If you want a T-Rex to look good, go with 1:85!

...except, of course, when something else works better. The Jurassic Park movies have been shot in a variety of different aspect ratios. Jurassic World was shot in a non-standard aspect ratio, 2:1.

If you are working in 3D, don't forget that you may need to adjust the focal length of your camera to get good results. Daz Studio uses 65mm lenses by default. For An Afternoon in Pal-Ul-Don I used a 50mm lens. Jurassic World used mostly 30mm and 60mm.

A bit of trial and error works wonders here. I decided what I wanted in frame first, then set the aspect ratio, and adjusted focal length and camera position until I was happy.

Speaking of happy...


If you value likes on Facebook more than you value creating a good picture, you might want to use the photography portrait aspect ratio, 3:2.

Because Facebook uses a narrow column for posts, using portrait format maximizes screen space.

To really see and experience the impact of a landscape format picture on Facebook, it is necessary to enlarge it by clicking on on it. Most people won't do that, even if you have created a great picture.

Instead, to maximize likes, you will either have to butcher your image and crop it down to portrait format, or design your picture for portrait format from the start.

With 3D, you can create a set of cameras using different aspect ratios, and use them to create different versions of the same scene.

Me, I am bull-headed and tend to go with the aspect ratio I like best on a picture by picture basis, even if it means the pictures won't get as popular on Facebook.

An Evening with La in Opar


"Then the priestess, standing above him, began reciting what Tarzan took to be an invocation, the while she slowly raised her thin, sharp knife aloft. It seemed ages to the ape-man before her arm ceased its upward progress and the knife halted high above his unprotected breast."
-The Return of Tarzan, Edgar Rice Burroughs, 1913.

La didn't kill Tarzan, of course. She fell in love with him, and tried to help him. Tarzan rejected her, so in the end, it was La who got her heart ripped out. Love is gruesome.

I loved the Tarzan books when I grew up, so I wanted to create one, perhaps a few more, Tarzan inspired scenes.

Tuesday 10 April 2018

Hulking Out!


I just could not help myself! I had to create a picture with The Hulk. Well, a Hulk-like character.

I created the character in Daz Studio, using a Genesis 8 Male as a base. Then I morphed the body using Daz own set of morphs for G8 males. I also morphed the face, but I am saving that for another picture.

I changed the skin color of course. If you do something like this, it is worth remembering that there are plenty of different color settings, for the skin, for highlights, for translucency, etc.

The hair is the Toulouse hair for G8 females. It gave him the look I wanted. I gave the hair a dark hair texture, and then gave it green highlights. Worked pretty well.

Saturday 7 April 2018

The Tunnel

I started working on The Tunnel about a year ago. The photo is a selfie I shot in a tunnel under a railroad a couple of kilometers from where I live.

I set my camera up on a tripod, took a remote triggered hotshoe flash in my hand, set the camera timer for 10 seconds, and ran like crazy to get into the right position in time.

It took several tries, but finally I had a shot that was good enough.

I wnt to a fish store and shot octopus tentacles. However, that did not work out as I had hoped. Dead octopi don't pose well.

After several tries, I finally put the picture aside. I realized I would have to try something else.

Awhile ago, I started using Daz Studio to compose 3D scenes. That got me thinking about using a 3D model of an octopus to create the picture you see. A couple of days ago I gave it a try.


With Daz, it was relatively easy to position the tentacles.


What you see here are the rendered tentacles, right out of Daz Studio.


I composited, added shadows, and relit the picture in Affinity Photo.

At this point, I had a so-so photo composite. It did not quite work as a photo, because the tentacles looked a bit artificial to start with. Also, the photo was a bit too clean. I wanted a dirtier tunnel.

Filters in Affinity Photo, Photoshop, and most other tools, do a mathematical transformation of the image. In many situations, that is exactly what you want.

However, I wanted a more painterly feel. At this point, I had two ways to go:
  • Use the Paint Mixer tool in Affinity Photo to paint the whole picture manually. That works very well, but it is also very time consuming.
  • Use Dynamic Auto-Painter to paint automatically, with manual input only where necessary. Much faster, nearly as fun, and arguably, better results. (Depending on how good an artist you are.)
I went with Dynamic Auto-Painter, and created the picture at the start of this blog post.


I also created a couple of variations. The very dark one you see here is actually closer to what I had in mind originally.

My son thinks this is the best version because "what you cannot see is scarier than what you can see."

He's got a very good point.

Because the picture is so dark, it can appear almost completely black on some monitors though.


I created an in-between version, darker than the first, but brighter than the second.

Which version you prefer, is of course up to you.

You can find these pictures, and a portfolio I am building, at ArtStation.